Showing posts with label google. Show all posts

10/02/2015

Schema: Marking Up the HTML for Improved SEO / Google Search Results

Using Schema Data to Describe Your Web Page


I've been looking for ways to improve a site's SEO. WordPress is the CMS and the theme is bought from a commercial entity. The theme does not include any kind of Schema tags.

Schema.org provides a long list of tag, or rather parameters for your existing HTML5 tags. These schema definitions are used to explain you web page's content even further beyond HTML5's specific tags.

For example, you might want to describe your web page as containing and "Article" or "Event." The latter could be described specifically as a "TheaterEvent", which would then contain specific details like "startDate", "endDate", "duration", and a "review".

Now, I'm trying to extend some of this website's content to include ratings for specific Arts & Entertainment reviews. The ratings are being entered as data using the WordPress plug-in Advanced Custom Fields. All the backend works fine, and data entry is easy, but the ratings are not showing up in Google as I'd hoped. The site's review is listed at the bottom of this image sans 5-Star Rating:


Google sometimes shows 5-Star Ratings on it's listings, which I thought was eye-catching and slightly out of the norm of most results. The first time I set this up, it worked.... I had to wait a couple of days to see if it worked, but the reviews started to show up with Star Ratings just like I'd planned. Then, I thought I'd try out some more of Schema.org's meta info, and that's where I seem to have run into a problem.

Can Schema Data Be Nested?


I don't know. It would seem the answer is yes, but there seems to be a specific formula to the hierarchy, and Schema does not explain how it will be interpreted. Or perhaps I don't understand the purpose of some of the tags.

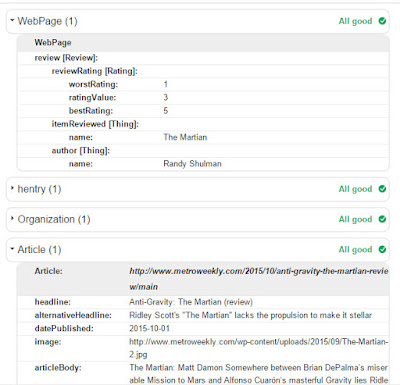
Google provides a Structured Data Testing Tool here that kind of shows whether you've done it right, but it's not entirely clear if you have or haven't. Obvious errors will show in Red, but here you see it says my attempt is error free. The "Review" and its contained "Rating" are showing at the top inside of the the general "WebPage".


"All good" it says, but it is not doing what I want on Search Results. Here's what I tried:

First, I put a schema wrapper of "WebPage" inside of this page's main <div> tag. 

Then, I wrapped the main content in an "Article" schema.

Then, I tried a couple of different things that had mixed results.
I tried to identify the "Breadcrumbs" on the page. The "Breadcrumbs" were inside the div that described the portion of the "WebPage" as an "Article". So, the "Breadcrumbs" were essentially inside the "Article." Google rejected this -- marked it in red as an error. So, I had to abandon that one.

The other thing I did was to add Schema tags for the "Article" section of "headline", subhead as "alternativeHeadline", "datePublished", "image", and "articleBody". The weird problem with this definitions was that the "image" was a required attribute of "Article". The "Article" was not valid without an "image". Really?!? How strange. This site has opted to always post with an image, but not every news article in the workd has or needs an image. So, kind of stupid to me that it threw an error.

The New Test


Anyhow, the Review is not showing up in the Google Search results with any stars. So, what I'm going to try next is to remove the "WebPage" definition. It doesn't really seem to make any difference. So, we'll see in a couple of days if Google decides that a "Rating" is okay but not an actual nested element of a "WebPage".


On first reload of the Google, it seems to accept the "Review" section, so let's hope this works:


If this works, I don't know what the point of the WebPage definition is. Also, I don't know yet how to define elements of a parent inside of the child. Like I said, putting the "WebPage" "Breadcrumbs" inside of "Article" was rejected. But the "Breadcrumbs" are still a legitimate part of the "WebPage". Seems both logical and odd to reject -- limited, perhaps. Maybe, there's a way to do this differentiation of nested elements, I haven't seen it yet.

3/19/2015

Google DFP and AdSense: How to create Responsive Ad Sizes for different browser & screen dimensions (using GPT)

Responsive Web Design and Ads Served by Google's Double-Click for Publishers (Small Business)


Once, upon a time you could rest assured that your web page was going to be viewed on a desktop computer hooked up to a land line running Windows, Netscape or Internet Explorer, and the maximum dimensions of the screen was 640 x 480.

In 2015, we have all types of computing devices, screen dimensions, browser types, operating systems, and internet connections, right?

TLDR: AdSense's new Responsive Unit's don't yet work with DFP. Instead, you'll change the Javascript ad tags that DFP generated for you. Add a sizeMapping to the header function. Then, you'll assign that mapping to the specific tag with a defineSizeMapping() function. After that, the DFP ads should be different based on the size of your browser's screen dimensions. Skip to instructions below.

The code for this project is at the end. But first, I just wanted to explain what Google's two ad-serving products are, and how they relate to one another -- AdSense and DFP.

AdSense and the new Responsive Ad Unit


Google's AdSense program is still the #1 advertising platform for publishers. Defining AdSense ads is pretty darn easy to do. And the code has been updated by Google so that you can now just plop a couple lines of Javascript into your design wherever you want the AdSense ad to show up.

AdSense also has a "Responsive Ad Unit" that you can specify instead of specifying the dimensions. You just drop in that responsive code and don't have to worry about any other programming to match the dimensions of the browser or device.

The one catch seems to be that, once the ad is shown, it does not resize to fit a browser window that changes dimensions (if the rectangular device is rotated or window is resized).

Double-Click for Publishers and the Problem with Ad Unit Specifications


However, many sites sell their own advertising (or hope to), and use Google's free DFP platform to serve banner ads (aka creatives). The creatives are often of different ad sizes to suit the designs of the publishers -- [300 x 250], [160 x 600], [728 x 90] are the most common "ad unit" sizes.

A DFP user can define names for these ad units -- ex. BigBox_TopBigBox_EmbedSkyscraperRight_SideLeaderboard_Bottom. These slots are then grouped together as "placements."

Setting up DFP to use AdSense


Sometimes a DFP user has no ad inventory ready. Either the advertisers have not provided ads for a specific ad unit size, or the ad units have gone unsold. The DFP user can do a couple of things to fill these blanks spots:

  1. Create their own Promotions / House Ads. Under Line Items > Settings, there is a "Type" menu which allows you to choose a low priority "House (16)."
  2. Default to using Google AdSense ads. First connect your DFP account to your pre-established AdSense account. Then, under Inventory > [Specific Ad Unit], check the box that says -- "AdSense inventory settings [x] Maximize revenue of unsold and remnant inventory with AdSense."

Having done that already, you can now worry about how ads are presented on different browser sizes.

Can I use a House Ad to serve an AdSense Responsive unit?


No. It probably won't show. Google doesn't like it anyway. There's a better way....

Setting Up DFP to Show on Your Site


When you want to get the Javascript code from DFP to place on your site, you will probably go to:
Inventory > Generate Tags. 

For whatever reason, Google chose to refer to these pieces of Javascript as "Tags."

There you can include the ad units you want to place on your site. The code you get comes in two parts and resembles something like this: 

<html>
<head>
<script type='text/javascript'>
var googletag = googletag || {};
googletag.cmd = googletag.cmd || [];
(function() {
var gads = document.createElement('script');
gads.async = true;
gads.type = 'text/javascript';
var useSSL = 'https:' == document.location.protocol;
gads.src = (useSSL ? 'https:' : 'http:') + 
'//www.googletagservices.com/tag/js/gpt.js';
var node = document.getElementsByTagName('script')[0];
node.parentNode.insertBefore(gads, node);
})();
</script>

<script type='text/javascript'>
googletag.cmd.push(function() {
    googletag.defineSlot('/99999999999/BigBox_Lower', [300, 250], 'div-gpt-ad-1426751800839-0').addService(googletag.pubads());
    googletag.defineSlot('/99999999999/Leaderboard_Upper', [728, 90], 'div-gpt-ad-1426751800839-1').addService(googletag.pubads());
    googletag.defineSlot('/99999999999/Skyscraper_Lower', [160, 600], 'div-gpt-ad-1426751800839-2').addService(googletag.pubads());
    googletag.pubads().enableSingleRequest();
    googletag.enableServices();
});
</script>
</head>
<body>


<!-- BigBox_Lower -->
<div id='div-gpt-ad-1426751800839-0' style='width:300px; height:250px;'>
<script type='text/javascript'>
googletag.cmd.push(function() { googletag.display('div-gpt-ad-1426751800839-0'); });
</script>
</div>

<!-- Leaderboard_Upper -->
<div id='div-gpt-ad-1426751800839-1' style='width:728px; height:90px;'>
<script type='text/javascript'>
googletag.cmd.push(function() { googletag.display('div-gpt-ad-1426751800839-1'); });
</script>
</div>


<!-- Skyscraper_Lower --><div id='div-gpt-ad-1426751800839-2' style='width:160px; height:600px;'><script type='text/javascript'>

googletag.cmd.push(function() { googletag.display('div-gpt-ad-1426751800839-2'); });</script>

</div>
</body>
</html>

The <head> section will contain the script that connects to Google. And it will also contain code for each ad unit that you included. A bit about the code itself and the matching highlighted colors:

  • Your DFP Publisher ID and Name of the Ad Unit.
  • The dimensions of the Ad Unit.
  • A (somewhat arbitrary) identifier used to invoke your ad unit and place it inside of a <div> of the same id.

Using DFP and Publisher Tags to Show Different Ad Sizes and Responsive Web Sites


You are going to use the Google Publisher Tag API to do a "Size Mapping" that says basically, "If the screen is this size or bigger, use an ad unit with this size dimensions; and if it's smaller than that, use this other ad unit size."

Most likely, your concern has to do with wide "leaderboard" ads -- 728px by 90. They're fine on your desktop layout, but with responsive content, the whole right side is lost. Nearly useless.

So, what alternative ad sizes do you have?

  • Maybe a standard "medium rectangle" = 300 x 250.
  • Maybe the "mobile leaderboard" = 320 x 50.
  • Maybe the new "large mobile banner" = 320 x 100.

So, for simplicity, I'm going to work with a decision between 2 options:

  • If the device or browser's screen size is at least 728px wide, show the regular "leaderboard."
  • But, if its anything smaller, show the standard "medium rectangle."

Finally, the Code!


It's really easy to do this. First, inside the "google.cmd.push(function() {", you're going to create a variable that will hold the sizeMapping functions, and parameters that define the substitutions to be used. 

The addSize function receives two parameters -- first the dimensions of the browser window that you specify; and second, the ad unit size that you'd like to show. The addSize functions are hierarchical -- the first one to match the specified window size or larger, seems to be the mapping substitution that gets implemented.

Here, I'm specifiying arguments for two options:
  • "If a screen size / browser window is 728px wide or larger, and the height is 0px or larger, than show an 728x90px leaderboard. 
  • And, if it is anything smaller (bigger than 0x0px), then show a 300x250px medium rectangle." 
Also, I'm assigning the this sizeMapping to a variable called "mapping1". Notice the dot notation after each addSize function call. A final build() function is added to the end.

var mapping1 = googletag.sizeMapping().
   addSize([728, 0], [728, 90]).
   addSize([0, 0], [300, 250]).
   build();

Next, you need to change the leaderboard tag slot definition. You will add a function call or two to the the command. First, you tell the slot that it is going to be associated with the new mapping. Then, you can also tell the command to collapse the <div> if it's empty for some reason. These functions must be added and called before the ending addService function. Each is separated with a dot notation.

    googletag.defineSlot('/99999999999/Leaderboard_Upper', [728, 90], 'div-gpt-ad-1426751800839-1').defineSizeMapping(mapping1).setCollapseEmptyDiv(true).addService(googletag.pubads());

That's it. Even though your leaderboard slot is defined as dimensions of 728x90, Google should detect the screen size and, if it is smaller than 728x90, substitute a 300x250 ad instead.

So, the new section in the header will look like this:

<script type='text/javascript'>
googletag.cmd.push(function() {
  var mapping1 = googletag.sizeMapping().
    addSize([720, 0], [728, 90]).
    addSize([0, 0], [300, 250]).
    build();

  googletag.defineSlot('/99999999999/BigBox_Lower', [300, 250], 'div-gpt-ad-1426751800839-0').addService(googletag.pubads());
  googletag.defineSlot('/99999999999/Leaderboard_Upper', [728, 90], 'div-gpt-ad-1426751800839-1').defineSizeMapping(mapping1).setCollapseEmptyDiv(true).addService(googletag.pubads());
  googletag.defineSlot('/99999999999/Skyscraper_Lower', [160, 600], 'div-gpt-ad-1426751800839-2').addService(googletag.pubads());
  googletag.pubads().enableSingleRequest();
  googletag.enableServices();
});
</script>


See Google's documentation:

1/28/2015

Google Docs: Replace Text / Date in Currently Selected Range of Cells: Google Spreadsheet Text to Columns Script

A Text to Columns function for Google's Spreadsheets 

This covers 2 topics:

  • Change non-standard text format to a date -- using a formula
  • Change an existing values in a Google Spreadsheet -- using a custom script.

Using a Google Sheet formula to convert YYYYMMDD to a standard date

I was downloading data from a Google Analytics Customized Report into a CSV file which I wanted to use in a Google Docs spreadsheet.

Example data:

DateSessionsPageviewsBounce RatePages / SessionNew Users
201501012,36112,7283.18%5.391,903
201501022,13712,8043.09%5.991,672
201501031,83312,8793.06%7.031,473
201501041,81612,8662.97%7.081,483

Delimiting the fixed width columns

As you can see, the first column has a genuine date in it, but it looks funky because it is not delimited. There is not slash or dash between the values of year, month and day.
I wanted to change YYYYMMDD into MM/DD/YYYY; and then change the resulting values to dates that the spreadsheet can work with. MS Excel can do this using a command called "Text to Columns"

I used this information from this page to create a formula that takes the fixed width value from a specified cell (in this case, A6), rearranges the order of the elements, and adds delimiters.

=DATEVALUE(Mid(A6,5,2) & "/" & Right(A6,2) & "/" & Left(A6,4))


Ex. Using this, "20150104" the function DATEVALUE converts the 8-character string or number into the U.S. date value "01/04/2014" (aka January 4, 2014).
But the problem is, the formula can't be entered into the original cell, right? The formula would replace the cell's value.


So, to see the correct value, you would have to place the formula into a different, blank cell. Perhaps, you might even create a new column to hold the value. Or, if you're like me, you want the new value to be in the same cell as the original value.


Using a Script to format all selected cells

Scripts can be used to add functionality to a document that doesn't already exist.

There's two parts to the process --

  1. Add an item to the menu bar, 
  2. Add a function that will execute when the menu item is selected.


As of January 2015, these are the steps to add the script:


  • Go to Tools > Script Editor...
An example or existing script will show up.
The onOpen function is where you insert the menu command.
The menu setup will contain a specific functionName to launch.
A second function is then created to invoke the specified functionName.
Here, we'll call the function name: convertDateYYYYMMDD.

The function first retrieves the values in the currently selected cells and saves them as an array called values.
A second blank array is created called newValues.
The script then loops through the current values and, if a value is not blank, it rearranges substrings taken from the date and inserts slashes between them. So, YYYYMMDD becomes MM/DD/YYYY.
Then it replaces the currently selected cell values with the new array.


  • To add the menu and functionality, paste this code into your Script Editor.


// ADDS MENU ITEM
function onOpen() {
  SpreadsheetApp.getActive().addMenu(
    'Convert', [{name:'Convert Date: YYYYMMDDD', functionName:'convertDateYYYYMMDD'}]);
}

// APPLY NEW DATE FORMAT TO SELECTED CELLS
function convertDateYYYYMMDD() {
   var values = SpreadsheetApp.getActiveRange().getValues();
 
   var newValues = new Array(); 
  for (i = 0; i < values.length; i++) {
    if (values[i][0] != '') {
      newValues.push(['=DATEVALUE(Mid(' + values[i][0] + ',5,2) & "/" & Right(' + values[i][0] + ',2) & "/" & Left(' + values[i][0] + ',4))']);
    } else {
      newValues.push(['']);
    }
  }
  SpreadsheetApp.getActiveRange().setValues(newValues);
}

  • When done, hit the Save button, and if this is new, name the project something meaningful to you.
  • You should see a new menu item: [Convert]. If not, you may need to save and reload your sheet.
  • If you see the menu item, first select the text you want to convert, then go to [Convert > Convert Date: YYYYMMDD].
  • The text may not look like what you were expecting. So, the final thing that you may need to do is to convert the selected cells to a date format. Go to:
Format > Number > Date

9/26/2014

Google Analytics: How to filter out "Amazon Technologies / Boardman" bot that creates inaccurate stats

My work server has been getting clobbered lately by some bot program at Amazon.com.

As a result, our Google Analytics visitor and Pageviews are off by thousands each month.
While it might look good in the numbers, it is terribly inacurate as far as real-world visitors are concerned. 

How to Check for Amazon's Awful Bot

Data proving this can be found in Analytics in a number of ways:

Check Method #1

Analytic Reporting > Audience >  Geo > Location > [ Explorer ] tab
     > United States > Oregon > City 

If you see a ton of visits from "Boardman," then your server is getting inundated by Amazon's servers, too.

Check Method #2

Analytic Reporting > Audience >  Technology > Network  

You will likely find, under "Service Provider," two listings for:
  • amazon.com inc.
  • amazon technologies inc.

Check Method #3

Analytics Reporting > Behavior > Site Content > All Pages
     > [ Seconary Dimension] button > Network Domain

You will likely see amazonaws.com 

How to Filter out Amazon's Run-Amok Bot

So, now that you are sure that some bot on Amazon's server is messing with your stats, you can create a Google Analytics filter.

Filtering is not as obvious as it should be, but creating one is not hard.

First, you need to be logged in as a User with the ability to Edit.

Next, go to the [ Admin ] tab at the top.
Make sure your domain is selected.
Click on  [ All Filters ] tab on the left.
Click on [ + NEW FILTER ] button.


Now, you're going to make two filters,
If you happen to live in Oregon or need to include the city of "Boardman," then perhaps only the first one.

Filter #1:

Filter Name: "AmazonAWS (bots)"
Filter type: Custom filter
Choose: Exclude
Filter Field: "ISP Organization"
Filter Pattern (very specific & without quotes): "amazon technologies|amazon\.com"
Case Sensitive: No
[ Add >> ] YourDomainName.com
Click [ Save ].

Filter #2: 

Filter Name: "Boardman (bots)"
Filter type: Custom filter
Choose: Exclude
Filter Field: "City"
Filter Pattern (very specific & without quotes): "Boardman"
Case Sensitive: No
[ Add >> ] YourDomainName.com
Click [ Save ].


That should take effect in a few hours.

The existing data will not be affected retroactively -- meaning, the Amazon / Boardman filters will only be applied to data from this point on.

You can check to see if it's working by doing the checks above in two days.
If the counts for the bots have dropped significantly or gone to zero, then you know your stats are being filtered and should be back on track ... at least for a little while.

Comment below and let us know if this worked for your.

3/15/2014

Google CSE: How to exclude parts of your page from your Custom Search Engine

Most web pages have an area for main content.

And then there is the sidebar. Usually, it's full of ads, or something more useful -- related links, the latest posts, most popular articles, tags.

When you create your Google Custom Search Engine, there's no obvious way to exclude the sidebar content from filling up your results with useless info.

Can you stop your sidebar and navigation keywords from being indexed and showing up in your CSE results?

It is possible, according to this Google page. (I'm waiting to see if this really works, though. Some have reported that results still contain extraneous pages, but relevance is reduced):
https://support.google.com/customsearch/answer/2364585?hl=en

You have to wrap the sidebar content in a tag that includes this class:
class="nocontent"
Ex. <div id="mySidebar" class="nocontent graytext blackborder">

In this example, there are three classes, one of which is "nocontent".
(Did you know you can have multiple classes added to an element?)

Wait, too easy -- not done yet. Do this next:

  • Go to your Custom Search Engine admin page.
  • Look at the tabs -- it will start on [Basics].
  • Click on [Advanced].
  • Look for "CSE context".
  • Click the arrow to open the details.
  • Clickon [Download (XML)].
  • Save the file. It will probably be called "cse.xml".
  • Open the file in a text editor. 
  • The second tag is for <CustomSearchEngine ...>
  • Add this setting inside that tag at the end:  enable_nocontent_tag="true"
Ex. <CustomSearchEngine id="vdu79999999" creator="0029715399999999" language="en" encoding="UTF-8" enable_suggest="true" enable_nocontent_tag="true">

  • Save the file.
  • Click on the button that says: [Upload XML file].
  • Upload the new (or altered) "cse.xml" file back to Google.
To make sure that it uploaded correctly, click on [View in browser].
-------

So what is this supposed to do?

According to Google, any content given a class of "nocontent" will be ignored by your Custom Search Engine. It should still be indexed by the regular Google Search, and Googlebot will still follow all of the links. But what you have changed, is a setting for CSE only.

How long will it take?

I don't know, I just did it. I don't even know if it really works. lol.
Google is awesome, but I cannot say this will or will not work.
Some have reported that they still get extraneous results, but that those pages have less relevance.

What's an alternative method of hiding content?

Well, you could have your side content in a separate HTML document or script; and then bring it into your main page using Javascript. The first potential problem might be that your visitor might not have Javascript enabled on their browser or device; so the sidebar would be blank. (It's rare, but could happen.) Also, bots that scrape web pages are pretty smart, and they might insert the text in there for you regardless. Another problem is that you might have Javascript inside your sidebar, and it may not be invoked after loading.

Anyway, to do this, you would create an empty <div> with an ID where you sidebar would go, and then replace the contents: ex. <div id="mySidebar"></div>

To replace the contents, you could use jQuery and its load function.

If you don't want to use jQuery, your Javascript is going to need to use XMLHttpRequest and innerHTML in some way that I cannot explain here.

You could also use an <iframe>.

5/01/2013

Connect Blogger Page to Google Webmasters Tools

If you want to delete a cached page from Google's search results or do some other specific operation with Google's Webmaster Tools, you'll need to connect your Blogger page with a meta tag.

To do this, first add your page to Google Webmaster Tools
  • Look down the list to make sure you (or Google) haven't already added your site.
  • If not, click the button in the top right that says [ADD A SITE].
  • Type in the URL of your site.
  • It should be added to your list of sites.
  • Click on Verify this site.
  • A page will show two types of options: 1) Upload a separate file. 2) Alternate methods.
  • Click on the [Alternate methods] tab.
  • There will be three options: 1) HTML tag, 2) Google Analytics, 3) Domain name provider.
  • Click on [ ] HTML tag. 
  • More info will pop up, and you need to copy the long meta tag that is in the box.
    (ex. <meta name="google-site-verification" content="6F8tVa..." />)
Now open Blogger in a new window.
  • Click on the Name of Your Blog.
  • In the left side menu, click [Template].
  • A thumbnail version of your site should appear.
  • There will be two options: 1) Customize, 2) Edit HTML.
  • Click on [Edit HTML].
  • It may take a moment to load....
  • You should see an textfield with you HTML code and line numbers running down the left side.
  • Around Line 4, there will be a <head> tag.
  • Add a blank line after that <head> tag by clicking behind it and hitting return on your keyboard.
  • Now, paste the <meta> tag that you copied earlier (see above).
  • Hit the button to [Save Template].
  • Hit the [Back] button, and if the change has been successful, there should be no warning message that your info has not been saved.
Flip back to the Webmaster Tools window.
  • Click on the [Verify] button for your blog. 
  • Hopefully, this will work. If it doesn't try again. 
  • Make sure the <meta> tag is complete, and that you're placing it right under the <head> tag. Anywhere else might not stay there.